
Have you ever walked into a dining room and felt like the hanging light was either awkwardly tiny or about to aggressively bonk you on the head?
You are not alone. As an online lighting specialist, I see 90% of homeowners make the same mistake: choosing the wrong fixture scale or hanging it at the wrong height. The result? A room that either feels cramped or completely lacks proportion.
Whether you are styling a cozy breakfast nook or a grand dining room, getting the proportions right is pure science. Save this definitive guide to master the golden formulas of pendant lighting and find the perfect match for your home.
The Golden Rules of Pendant Hanging Height
When hanging a pendant light over a dining table, you need to balance two things: eye-level comfort and optimal light spread.
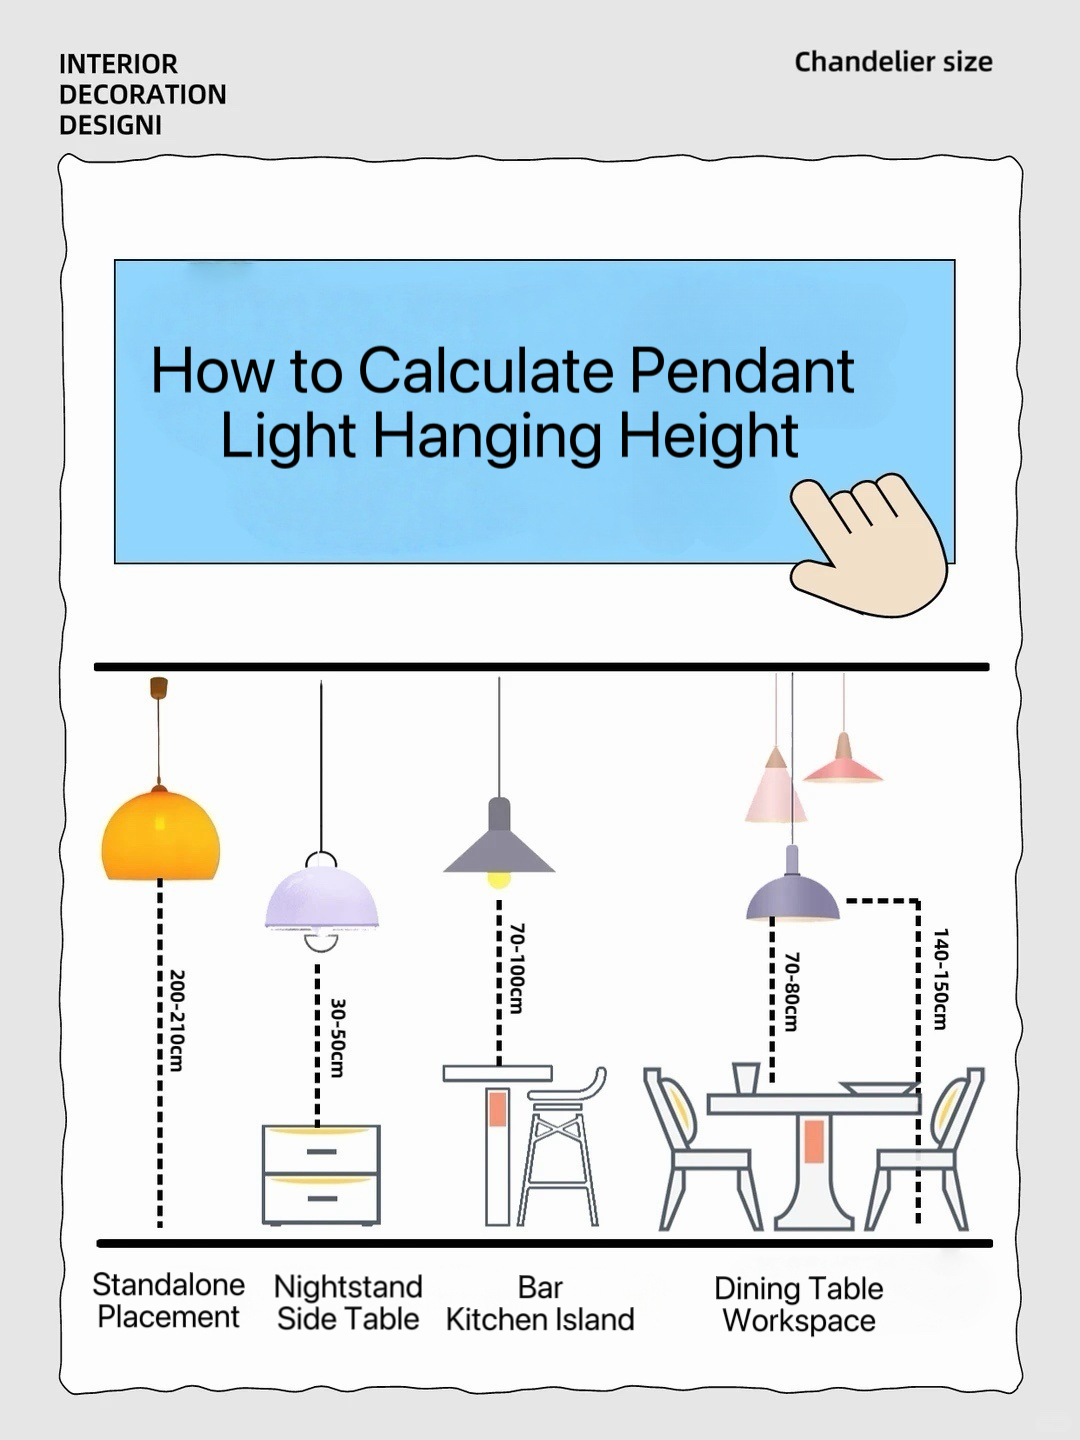
1. The Clearance Formula
-
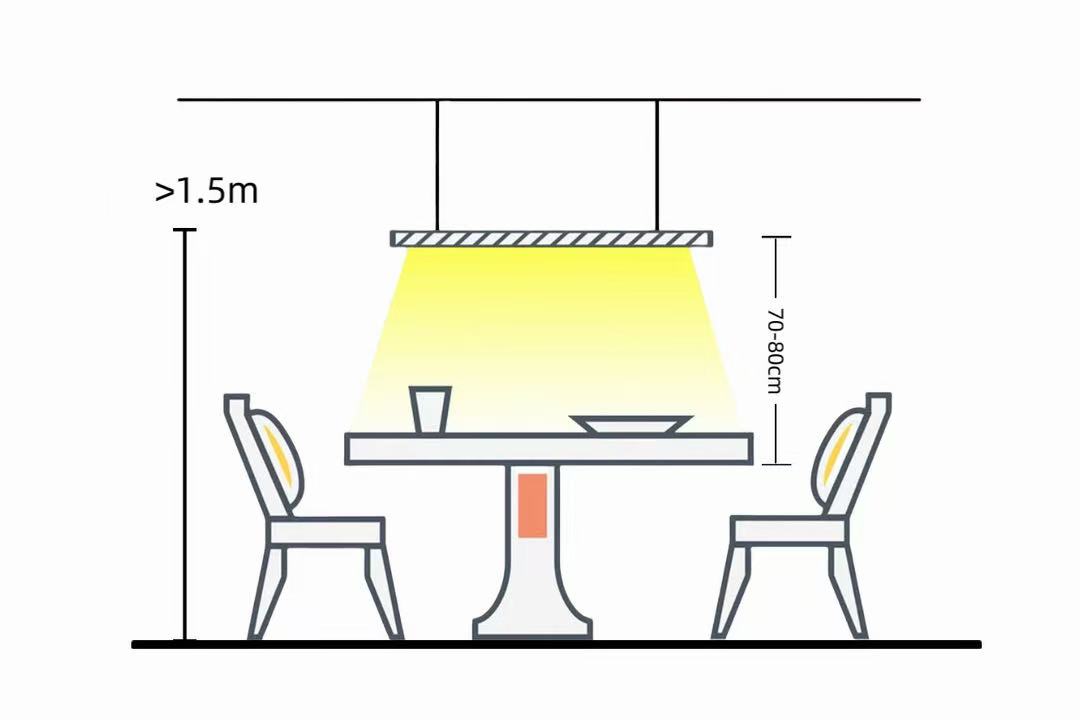
The Rule: The bottom of your pendant light should hang 30 to 36 inches (75 to 90 cm) above the surface of your dining table.
-
Why it matters: This is the sweet spot. It keeps the light low enough to create an intimate, focused dining ambiance without blocking your view of the person sitting across from you.
2. The Floor-to-Fixture Metric
-
The Rule: For standard 8-foot ceilings, the bottom of the fixture should sit roughly 55 to 60 inches (140 to 155 cm) above the floor.
-
Why it matters: This ensures the light aligns beautifully with your standing line of sight, preventing glare while maintaining a balanced architectural scale in the room.
The Dining Table vs. Pendant Size Blueprint
The size of your table dictates the scale and number of your fixtures. Hanging a single small bulb over an 8-foot farm table looks lost; hanging a massive chandelier over a bistro table feels suffocating.
Here is the exact breakdown for linear and rectangular tables:
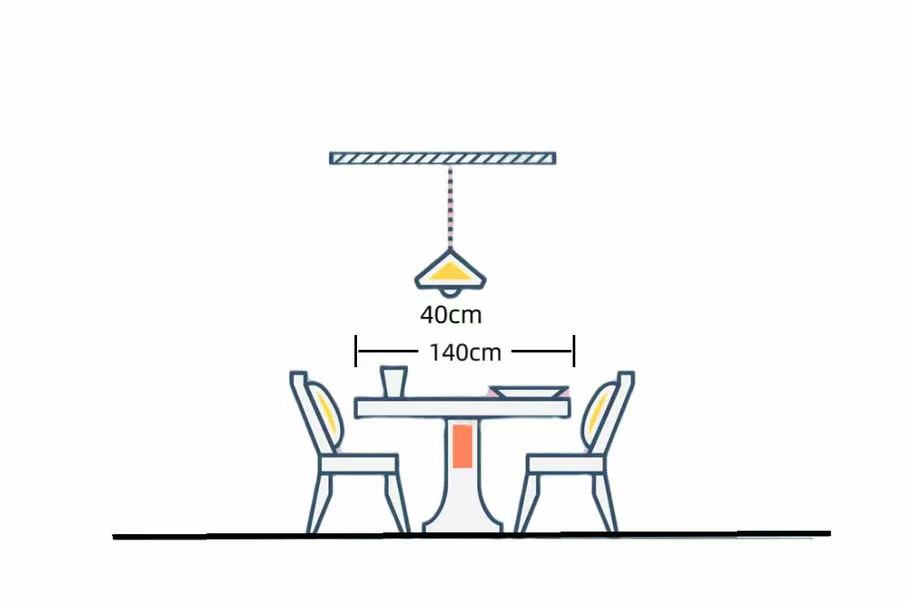
🔹 Small Tables (Under 4.5 Feet / 1.4m)
-
The Setup: Best suited for a Single Statement Pendant.
-
The Math: Look for a fixture with a diameter of 18 to 20 inches (45 to 50 cm).
-
This size is perfect for creating a focal point with a dramatic texture, such as a Wabi-Sabi organic fabric pendant or a mid-century lights.
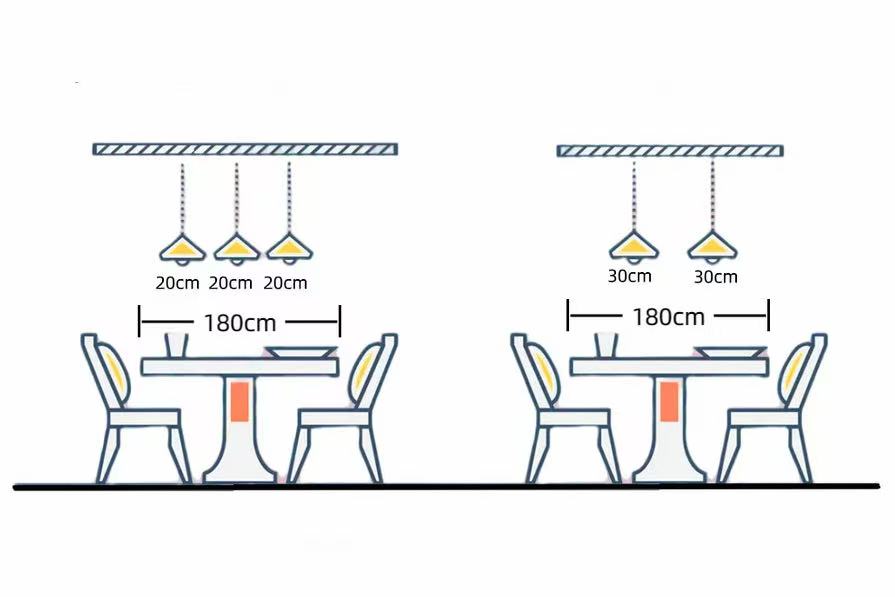
🔹 Medium Tables (4.5 to 5.5 Feet / 1.4m – 1.7m)
-
Option A (Double Pendants): Use two fixtures with a diameter of 10 to 12 inches (25 to 30 cm) each. Space them about 14 inches (35 cm) apart.
-
Option B (Triple Pendants): Use three smaller fixtures with a diameter of 6 to 8 inches (15 to 20 cm) each, spaced 14 inches (35 cm) apart.
🔹 Large Tables (6+ Feet / 1.8m+)
-
Option A (The Trio): Use three substantial fixtures with a diameter of 10 inches (25 cm) each, spaced 18 inches (45 cm) apart.
-
Option B (The Duo): Use two large statement pieces with a diameter of 16 inches (40 cm) each, spaced 20 inches (50 cm) apart.
Large tables look stunning with a repeating sequence. Lining up two or three handwoven rattan pendant lights adds a high-end, coastal-modern or Japandi resort vibe to large dining spaces.
The Living Room Blueprint: The "Feet-to-Inches" Golden Rule
Unlike dining tables, a living room chandelier needs to scale with the entire volume of the room, not just a single piece of furniture. If your living room light is too small, it gets swallowed by the space; too large, and it overwhelms the seating area.
So, how do you find the perfect diameter for an open living space or a grand foyer? Designers use a brilliant, simple mathematical shortcut known as the Feet-to-Inches Rule.
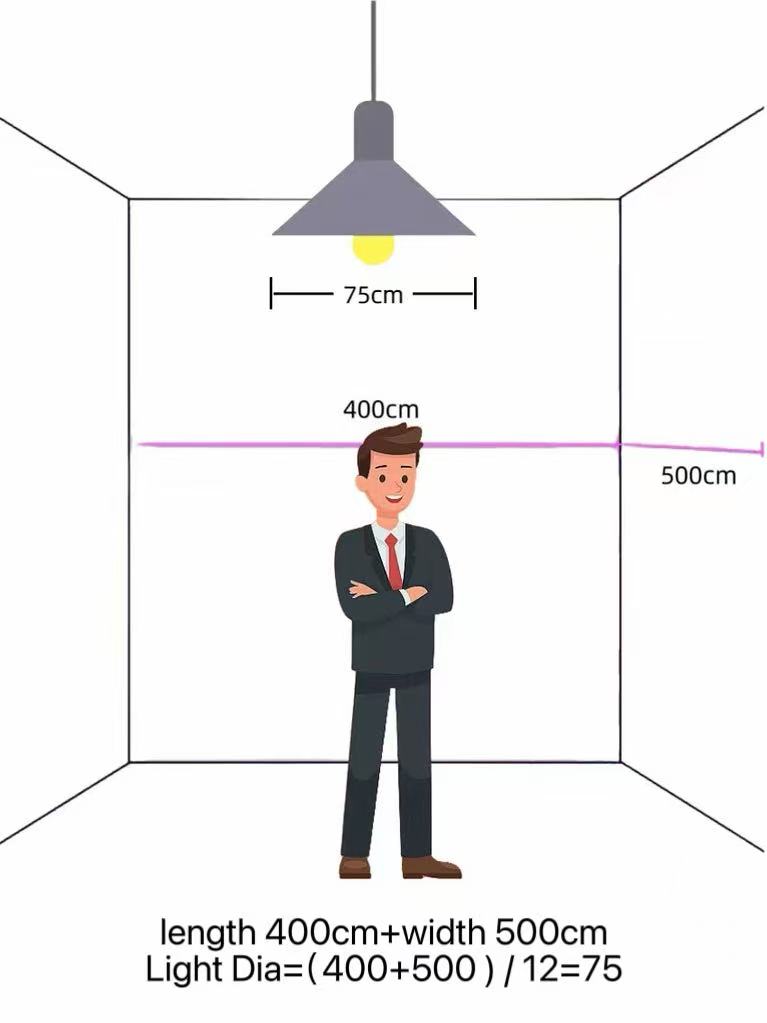
🌟 The Universal Sizing FormulaTo determine the ideal diameter for your living room centerpiece, follow this 3-step process:Measure the length and width of the room in feet.Add those two numbers together.Convert that total directly into inches. That number is your perfect fixture diameter!
Let's Look at the Example from image:
-
The Space: A standard living room measuring 400cm✖️500cm.
-
The Math: (400cm+500cm)/12= 75cm
-
The Result: The ideal living room light fixture should have a diameter of approximately 75cm diameter.
The Essential Designer Math (The Formulas)
Want to double-check your math before hitting "Add to Cart"? Use these two cheat-code formulas used by interior designers:
Formula 1: The Linear Spread Rule
To find the total span that your lighting combination should cover over a long table:
Example: For a 72-inch table, your lighting layout (from the left edge of the first light to the right edge of the last light) should span between 32 and 43 inches.
Formula 2: The Single Pendant Diameter Rule
To find the ideal width for a single central pendant:
Bedside Pendants: Crafting a Cozy, Boutique-Hotel Bedroom
Swapping out traditional bedside table lamps for hanging pendants is one of the easiest ways to instantly elevate your bedroom's luxury factor. Not only does it clear up precious surface space on your nightstand, but it also introduces beautiful vertical lines into your bedroom design.
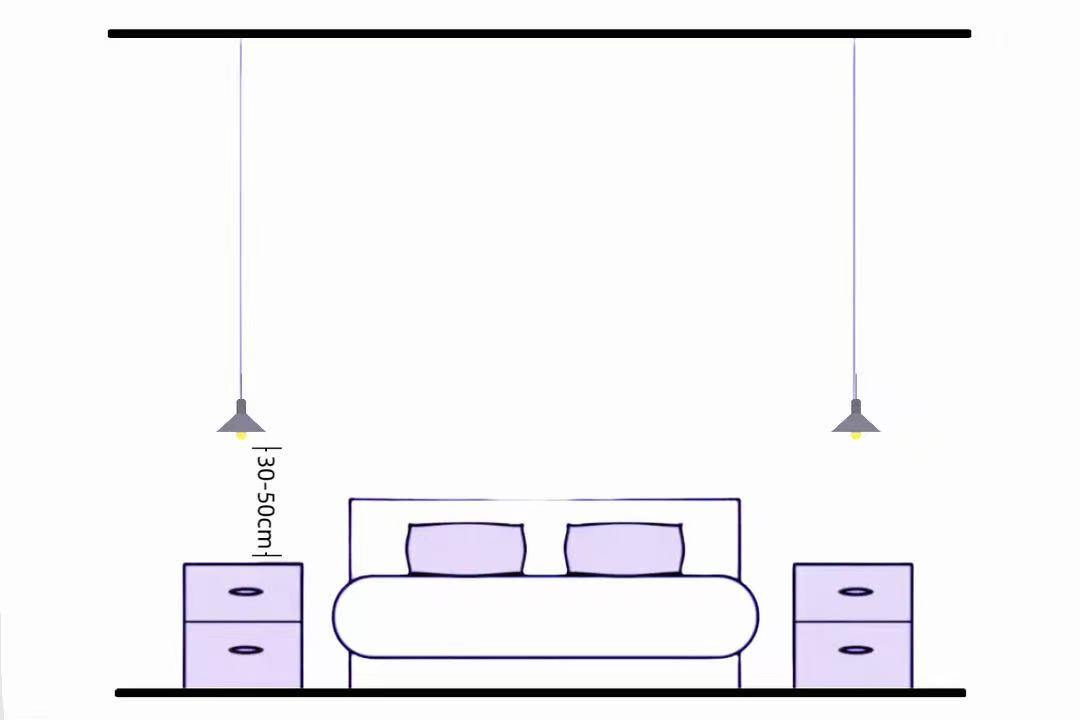
But how low should they hang to avoid glaring in your eyes while you read in bed? As shown below, the golden metric relies entirely on the height of your nightstand.
The Nightstand Clearance Formula
-
The Rule: The bottom of your bedside pendant should hang 12 to 20 inches (30 to 50 cm) above the top surface of your nightstand.
-
Why it matters: This height keeps the light low enough to provide focused, intimate task lighting for reading, while ensuring the fixture remains well below eye level when you are standing up, preventing harsh, direct glare.
Critical Mistakes to Avoid (Pro-Tips)
Before you drill holes into your drywall, make sure you haven't overlooked these three critical layout traps:
-
1. Watch the Edges (The Buffer Zone): When arranging multiple pendants, always leave at least 8 inches (20 cm) of negative space between the outer edge of the end fixtures and the edge of the table. This prevents the lighting from feeling like it’s "falling off" the table.
-
2. The Round Table Trap: If you have a round dining table, your pendant's diameter should never exceed 1/3 of the table's total diameter. A round table requires a centralized, cohesive point of light rather than a wide linear spread.
-
3. Layer Your Lighting with Dimmers: Don't let your pendant do all the work. Pair your overhead island or dining lights with wall sconces or floor lamps. Most importantly, always install a dimmer switch. It allows you to transition from bright, functional task lighting during prep work to a low, warm, romantic glow for dinner parties.
Ready to Transform Your Space?
Now that you have the measurements down, it’s time to find the perfect style. Explore our curated collections of Minimalist Japandi Lighting and Acoustic Fabric Pendants to find a fixture that brings warmth, texture, and perfect proportions to your home.
Have questions about a tricky ceiling height or an angled roof? Drop a comment below, or upload a photo of your space—our design team is here to help you calculate the perfect fit!